An important Zoom meeting just ended, packed with insights and action items. There’s only one problem: a week later, team members are scrambling to recall key points and decisions—and there’s no recording of the session. Sound familiar?
Information is priceless, and capturing the information shared in Zoom meetings can mean the difference between your team thriving and merely surviving.
Zoom recordings help you onboard new employees quickly, close more deals by gaining insights from past client interactions, and even improve your products by revealing new details from customer feedback. But recording Zoom meetings isn’t always a straightforward process.
Learn how to record a Zoom meeting to improve collaboration and performance, plus get tips for streamlining efficiency by using Loom, one of the best screen recorder tools, to record your Zoom calls.
How to record a Zoom meeting
There are two ways to record your Zoom meetings: local and cloud. All Zoom plans, including free ones, have access to the local recording option, which saves video and audio files to your device. But only paid plans can save Zoom cloud recordings.
Hosting Privilege
To record meetings, you'll need hosting privileges. If your account already has hosting control or you are the main host, you can skip this section. Otherwise, the account admin can enable the co-host feature by following the steps in this video:
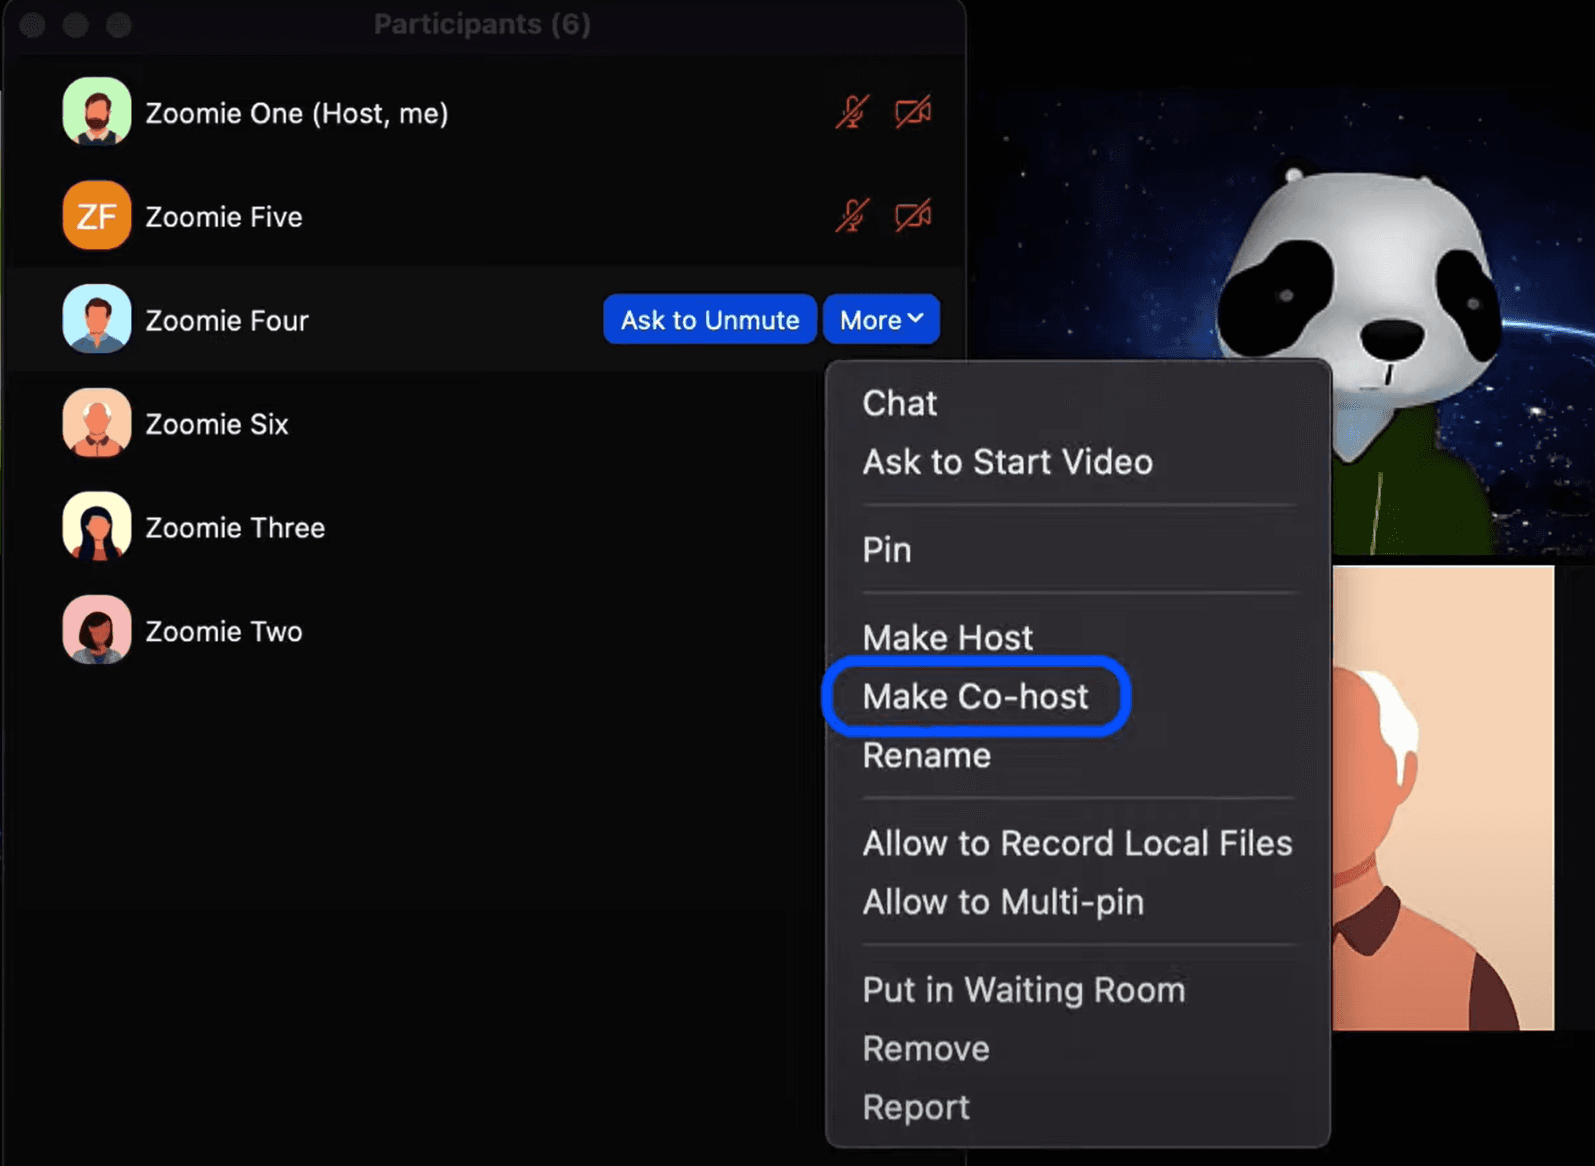
Once the Co-host option has been turned on, your current meeting host can grant hosting privilege to you by following these steps on the desktop, web, or mobile app:
Open your meeting controls and tap “Participants.”
Hover over the name of the person you want to make co-host, then click “More” or the ellipsis icon (...).
Tap “Make Co-Host.”
Once you have the host or co-host title, here’s how to create Zoom cloud and local recordings.
Cloud recordings
You can create Zoom cloud recordings on the Mac and Windows desktop app, mobile app, and Zoom web app.
Step 1: Enable cloud recording
To enable cloud recording, you need to be the account owner or have admin privileges. Here’s how to enable this option as a user:
Sign into your Zoom web portal and click “Settings” in the top navigation menu.
Tap the Recording tab, then tap “Cloud Recording” to toggle it on.
Another pop-up window may appear asking you to approve this change. Tap “Enable” to approve it.
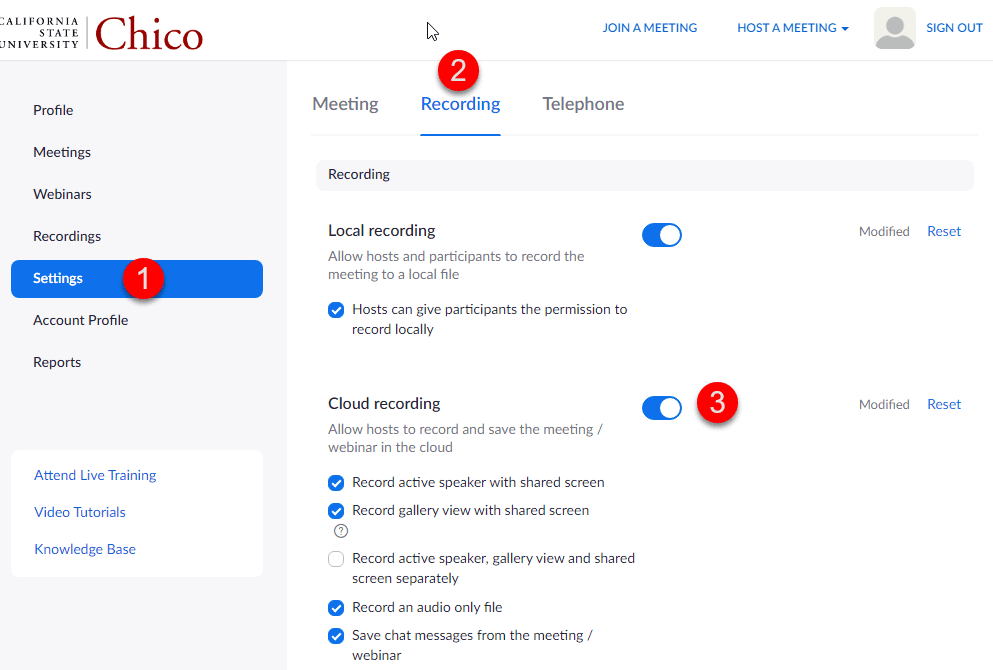
Quick note: If the Enable option is grayed out, you may not have the correct permissions to turn on cloud recording. Message your team’s Zoom account admin for help.
Step 2: Adjust your recording settings
You can change your recording settings in the same spot where you enable recording. Some potentially helpful features include:
Record active speaker with shared screen: This records both the view of the active speaker and any content on the shared screen.
Record audio-only files: This records the audio of your meeting separately from the video.
Record the interpretation: If you have an interpreter on your call, you can record their audio and video for both sign language and foreign languages.
Create audio transcript: This automatically transcribes your recordings.
You can also choose to optimize your recording for a third-party video editor in the settings if you plan to use meeting clips in other video content.
Step 3: Start recording
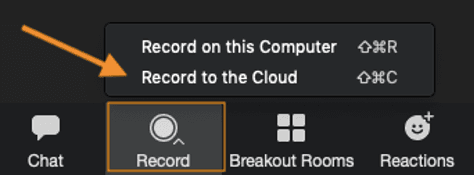
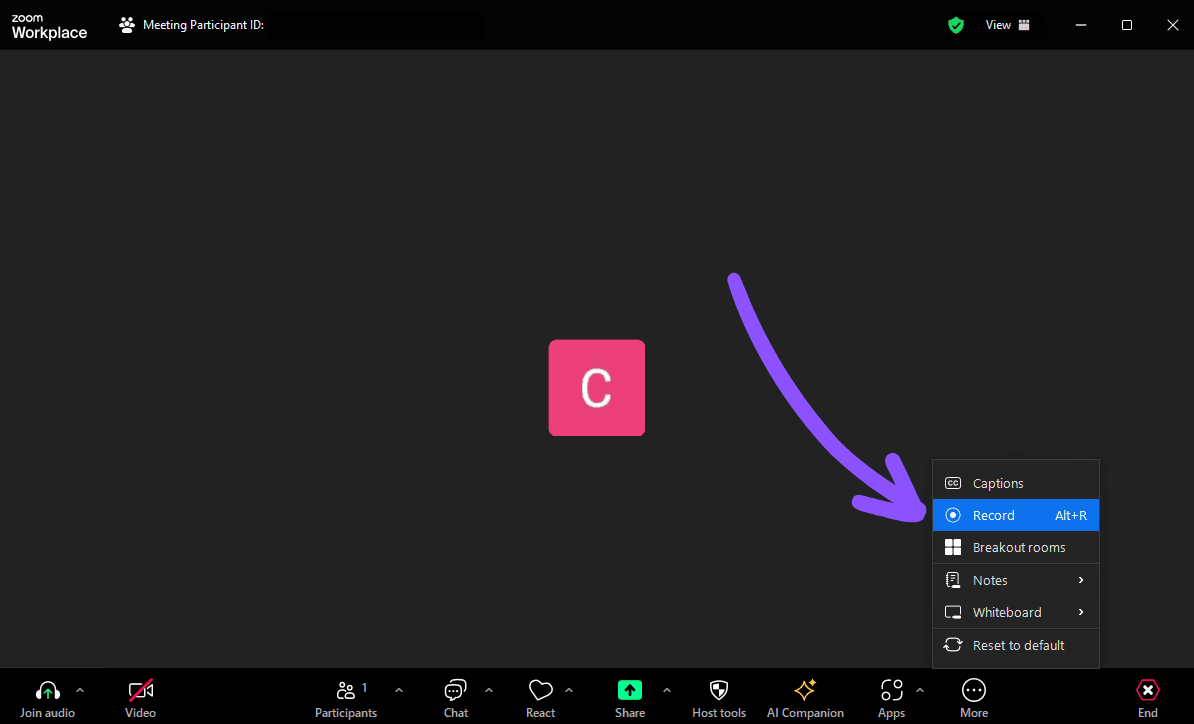
Once you have host or co-host controls, you can start cloud recording your meeting using these steps:
Click the “Record button” at the bottom of your screen and choose “Record to the Cloud” to start recording.
When you’re ready to stop recording, tap “Stop Recording” or “End Meeting.” Alternatively, you can tap “Pause” to temporarily stop recording.
Local recordings
Using the free Zoom app or prefer to save your recording to your device? You can create a local recording as long as you’re using the Zoom desktop client on Windows, macOS, or Linux. Here’s how to do it:
Step 1: Enable local recording
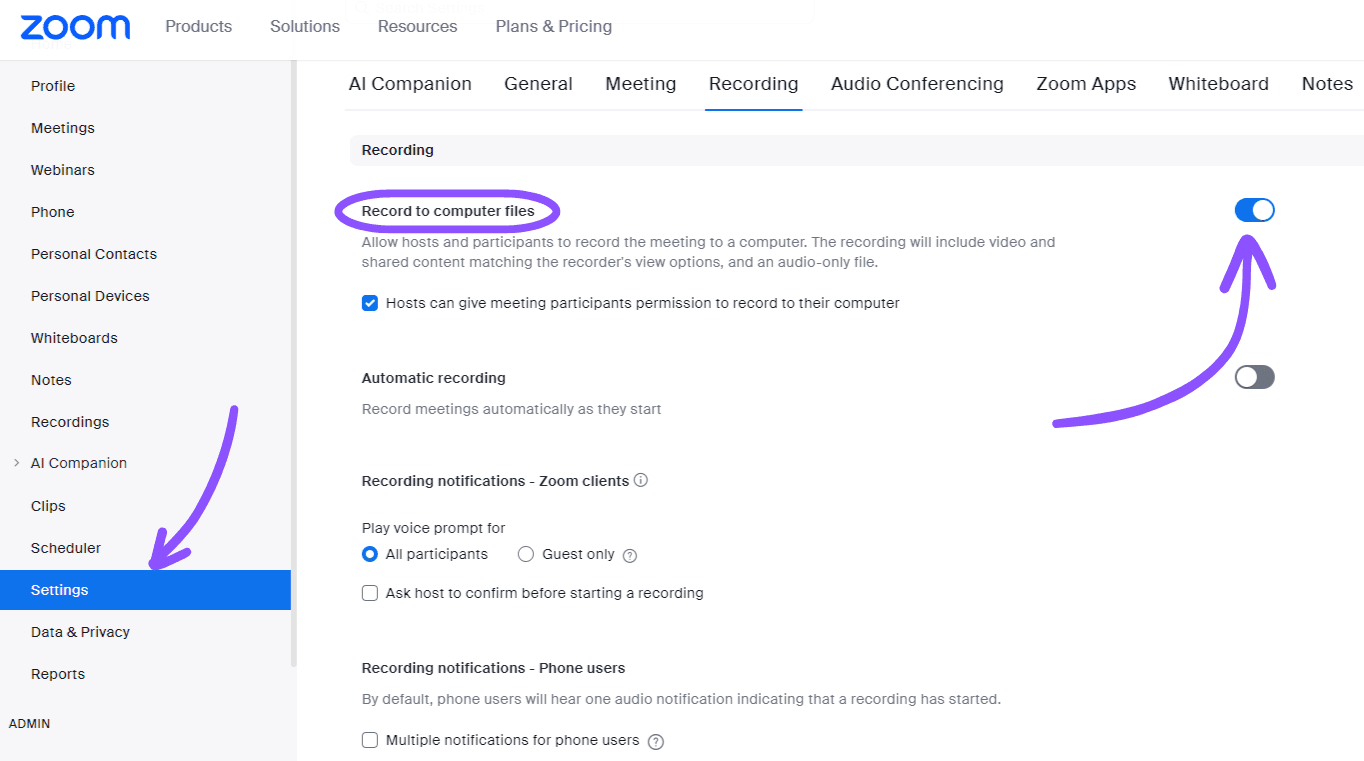
Sign into your Zoom web account, then choose “Settings” under the Personal section of the left-hand navigation menu.
Select the Recording tab in the top menu, then tap to turn on the toggle next to “Record to computer files.”
You may see another window pop up asking you to verify this change. Click “Turn On” to approve.
Step 2: Update your recording settings
This is also where you can turn on local recording features, like notifying participants that recording has started.
Step 3: Start recording
In your Zoom app, start or join your meeting as a host or co-host.
Tap “Record” in the bottom menu. If you don’t see this option at the bottom of your screen, click “More” and choose “Record” from the pop-up menu.
If a new menu pops up with additional options, click “Record on this Computer.”
Recording stops once your meeting is over, or you can click “Pause” or “Stop Recording” at the bottom of your Zoom window.
Once your meeting is over, Zoom converts your recording and saves the files on your device using the following naming conventions:
Audio and video file: video[random number].mp4
Audio only file: audio[random number].m4a
Look for your local recordings in your Documents > Zoom and in a folder labeled with the date of your recorded meeting.
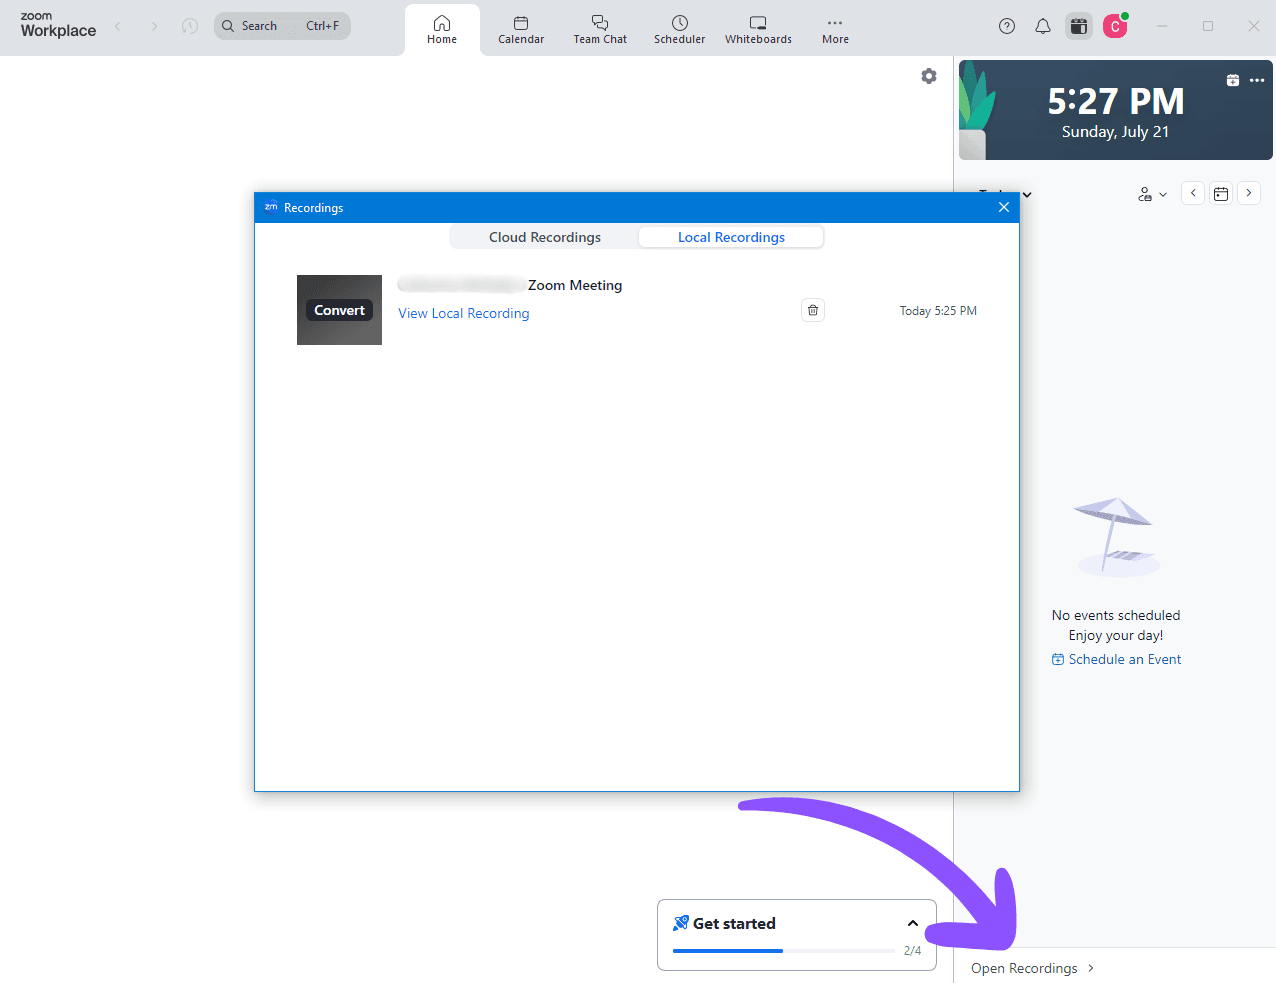
You can also find them by clicking the “Open Recordings” button in the bottom-left corner of your Zoom window and selecting the Local Recordings tab.
How to record a Zoom meeting on your phone
While you can’t save a local recording on your mobile device, you can create a cloud recording as long as you have a paid Zoom account. The steps are the same whether you use an iOS or Android phone:
Record a Zoom meeting on your Android or iPhone
Start or join a Zoom meeting as a host or co-host.
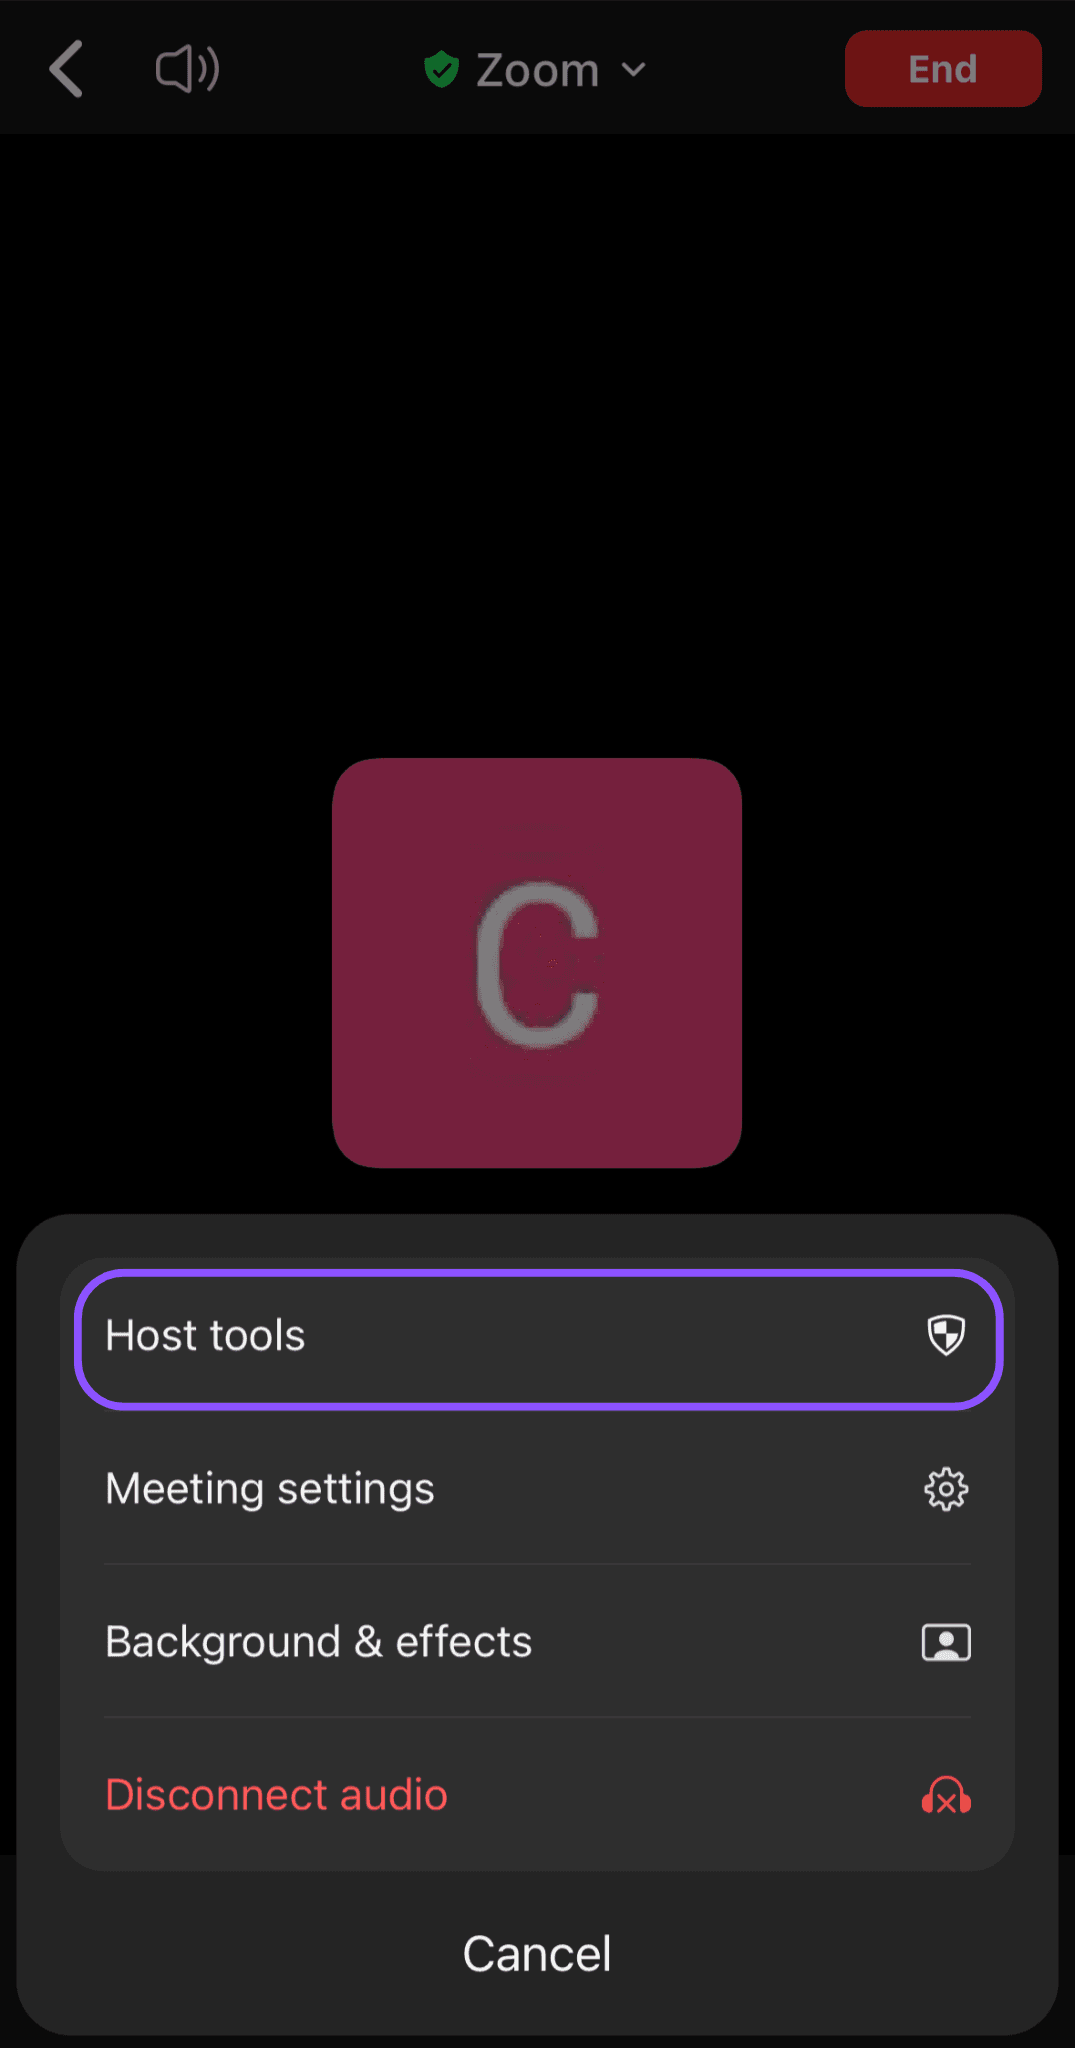
Tap “More” at the bottom of your screen—you may need to scroll to the right to find this option.
Tap “Host tools,” then choose “Record to the Cloud” if you’re on iOS, or “Record” for Android.
You should now see a recording indicator in the top-left corner of your screen.
Pro tip: You can also record your Zoom meetings using free, built-in tools on Mac and PC. Learn how to screen record on Windows and how to screen record on a Mac in these easy guides.
When to record Zoom meetings
There are multiple reasons why you might want to record a Zoom call, such as logging feedback for coworkers to revisit or sharing updates with teammates who couldn’t attend a meeting.
Recording a Loom or Zoom call for these situations adds helpful context for viewers, such as a friendly tone of voice when sharing praise and constructive criticism or what items were considered before a final decision was made for a project—and they can re-watch Loom and Zoom recordings if they need a refresher.
Recordings also let team members watch the video when they’re able to rather than tearing them away from their focus time. Microsoft’s 2023 State of Work report found that 68% of workers report a lack of uninterrupted focus time during their workdays, and meetings can quickly become an inconvenience that delays projects and reduces productivity.
Consider turning on Zoom recordings during these situations to benefit your team.
New hire orientation and training: Use recorded meetings as tutorials for new team members so they can see processes in action.
Project and decision documentation: Record your Zoom meetings to document what decisions were made and why, the latest status updates, the next steps and their assignees, and retrospectives.
Knowledge sharing: Share recordings of your design brainstorming session in Figma or a pair programming session to help teammates gain new skills.
Performance reviews and feedback: Record one-on-one meetings between managers and direct reports, plus feedback from peers to document current statuses, areas of improvement, and goals.
Client chats: Get consent and record your client meetings so you can review and share important details.
Accessible content: Create recording transcripts to help coworkers who are hard of hearing, speak English as a second language, and so those who couldn’t attend gain value and stay in the loop.
Recording your Zoom meetings also gives certain employees a chance to access the content at a time that’s best for them. This can help them avoid Zoom fatigue on meeting-heavy days or maintain their focus if they have a project deadline on the horizon.
How to share your Zoom meeting recordings
Already recorded your Zoom call? Here’s how to share it with others:
Step 1: Find your Zoom recordings
Depending on whether you created a cloud or local recording, you can find your recorded Zoom meetings in the following locations:
In your Zoom web account:
Log into your Zoom web account.
Click “My Account” in the top-right corner, and then select Recordings from the left-hand navigation.
Choose the “Computer recordings” tab to find your local recordings, or choose “Cloud recordings.”
In the Zoom desktop app:
Open your Zoom app and log in.
In the bottom right-hand corner of your Home dashboard, click “Open Recordings.”
This opens a new window where you can select the “Cloud Recordings” or “Local Recordings” tab.
Find local recordings on your device:
Find your Documents folder and open it.
Next, look for the Zoom folder, then open it and look for a meeting recording folder labeled with the date and time of your recorded meeting.
Step 2: Share your recording
For cloud recordings:
Once you’ve located your recordings, click “Share” next to the recording you want to share.
A window with a shareable link should appear. Copy the link.
Adjust any viewing permissions and set a recording password if you like.
For local recordings:
If you’ve located your recording by clicking “Open Recordings” in the Zoom desktop app, click “View Local Recording” under the meeting you want to share. This opens a new window with your recording files inside.
Upload your recording to a cloud storage service like Dropbox or Google Drive. If your recording is split into separate audio and video files, you may need to use a third-party video editor to combine them into one file.
Use your cloud storage service to create a shareable link.
Alternatively, you can upload your local recordings to an email, YouTube, or messaging service—though the file size may be too large. This is why sharing a link is often more ideal.
Alternative: Connect Zoom to Loom for ready-to-share recording links
Here’s the tea: Sharing Zoom meeting recordings can be frustrating. Depending on your Zoom plan, you’ve got limited room for cloud recordings—and local recordings create large files that can take a while to upload to a cloud storage site or email draft.
Thankfully, you can simplify the sharing process. As long as you have the Loom Enterprise plan, you can connect Loom to your Zoom account and import any Zoom cloud recordings.
You can do this manually for all existing Zoom recordings, then set Loom to auto-import any future Zoom cloud recordings. Once your Zoom recordings are uploaded to your Loom account, you can quickly create a shareable link to send in an email, over Slack, or wherever makes sense.
Not sure Zoom is right for you? Discover seven Zoom alternatives that boost team collaboration with their unique, remote-friendly features.
How to use Zoom recordings to extract the most value from your meetings
Why record your Zoom meetings? It’s simple: Zoom recordings offer a lot of benefits beyond real-time video conference calls. Here’s how to get the most value out of your recorded meetings.
Keep it organized: Organize, name, and label your recordings in a consistent way that helps colleagues easily find the right meeting to rewatch.
Share knowledge: Share recordings with teammates who couldn’t attend the meeting or those marked as “optional” who could still benefit from updates.
Create accessible recordings: Transcribe your meeting recordings to make them more accessible to those with hearing difficulties or who speak English as a second language. You may also want to adopt additional accessibility strategies—CultureAlly suggests having each speaker announce who they are and describing presentational visuals.
Make it easy to find information: Highlight, timestamp, and add notes to key moments in your recordings to call out important topics and action items.
Always get consent: Set clear guidelines for gaining consent to record meetings while maintaining trust with the team and any external clients or stakeholders.
Optimize your recording settings: Adjust your recording settings to capture essential elements like shared screens, the current speaker’s video, and the interpreter's view.
Share an agenda beforehand: Create and share a meeting agenda before hopping on Zoom to ensure the discussion stays focused and your recording is short and sweet. You can even record a quick Loom video to share these key insights. As employee engagement software Assembly notes, agendas keep attendees focused, productive, and informed enough to make decisions within the allotted time.
These tips can help remote teams collaborate more effectively and create a valuable archive of information that everyone can continuously reference.
How to stack Loom and Zoom for streamlined workflows
Loom vs. Zoom: it’s not a question of whether you should use one or the other but how to boost productivity with both tools. Together, Loom and Zoom can reduce unnecessary meetings, build a strong knowledge-sharing culture, and better accommodate diverse and distributed teams.
Here’s how to use these two video communication platforms to help your team collaborate in the most efficient and flexible way possible.
Use Loom before and after Zoom meetings: Record a Loom video to share an agenda with teammates before your Zoom meeting starts, then send follow-up video messaging to clarify discussion points and clear up any confusion.
Import Zoom recordings to Loom: Automatically import your recorded Zoom meetings to Loom and share them on the spot with an auto-generated link. Adding your Zoom recordings to Loom also creates a single source of truth for documented processes, decisions, and updates while giving coworkers a chance to leave emoji reactions and comments directly on your video.
Summarize Zoom meetings with Loom: Create Loom videos to summarize key takeaways from your meeting and share them with teammates who couldn’t attend. You can also include a link to the full Zoom recording if they want to watch the whole thing or stitch a Loom video to the beginning or end of your Zoom recording to add additional context.
Include Loom as a sales prospecting tool: Connect with new leads by sending them a Loom greeting that includes an embedded CTA link. This allows prospects to view your messaging on their own time—and then follow up by requesting a Zoom call.
Document bugs and issues with Loom: Record a short Loom walkthrough explaining and showing the bug you’ve encountered, then send it to your dev team instead of hopping on an impromptu Zoom call. Plus, Loom AI converts your video into a Jira or Linear bug report.
Save and share Zoom recordings using Loom: Upload your Zoom recordings to Loom and create helpful onboarding and training videos. Now participants can pay more attention and worry less during meetings knowing there’s a recording they can watch afterward.
Ready to give it a try and see how Loom can enhance your real-time Zoom meetings?