You’ve got a brilliant idea for a YouTube video. The script is ready, the camera’s charged, and you’re ready to share your content with your audience. But to fully showcase each intricate detail, you’ll need to capture your screen.
Whether you’re a tech guru, a creative DIY enthusiast, or simply someone who wants to share their knowledge, there’s a simple solution: recording a YouTube video directly from your laptop or phone.
Learn how to record YouTube videos across all your devices, whether you’re using a Mac, PC, iPhone, or Android.
How to record YouTube videos on your laptop
Here’s an overview of how to screen record YouTube videos on your Mac and Windows PC.
Recording YouTube videos on your Mac
When it comes to recording YouTube videos on your MacOS, you have a couple of options.
You can use your Mac's built-in screen recorder, which is convenient and easy to access, or explore third-party tools like Loom, which offer additional benefits for YouTubers.
There are several distinct advantages you’ll get with Loom:
Camera + screen capture: Loom allows you to simultaneously record audio and screen as well as your webcam, helping you create engaging YouTube videos.
User-friendly interface: Loom’s intuitive design simplifies the recording process.
Easy sharing and uploading: With a single click, you can get a shareable link and download high-quality videos for YouTube.
Edit video by transcript: Loom allows you to edit your video directly from the transcript, saving you time and effort by letting you make precise edits.
Extra features: You can edit and enhance your videos with Loom’s editing tools, including trimming, stitching them together, embedding links, and adding annotations.
Step 1. Get Loom
Visit the Loom website and download the app for your Mac or the Chrome extension. It’s free to get started.
Once Loom is installed, create an account or log in if you already have one.
Step 2. Choose your recording mode and area
When you open your Desktop app, you’ll see three options to record your YouTube video with Loom:
Screen + Camera: This mode is perfect for most YouTube content, especially if you’re recording explainer videos, tutorials, or product walkthroughs. It captures both your screen and your webcam.
Screen only: Use this if you don’t want to be on camera.
Camera only: Choose this for vlogs or quick updates.
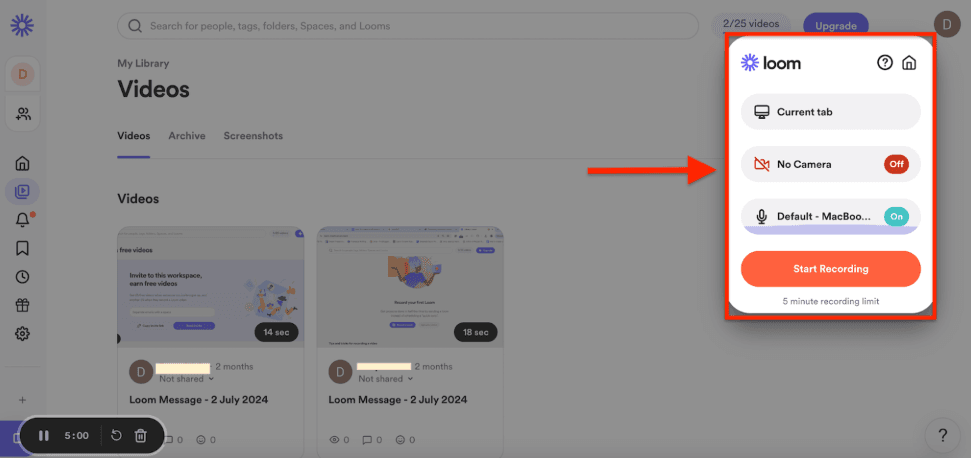
You can also select the specific screen you want to record:
Full screen: Records everything on your screen
Window: Records a particular app (like a web browser)
Current tab: Records your current internet browser tab
Camera only: Records only your face
Step 3. Configure audio settings
Choose your microphone. Make sure it’s working properly for the best audio quality.
You can also choose to turn off the audio altogether.
Step 4. Start recording
Select the “Start Recording” option to start recording your YouTube video with Loom. A countdown will begin, giving you a moment to get ready.
While recording, you can use controls at the bottom of your screen to pause, stop, or cancel the recording if necessary.
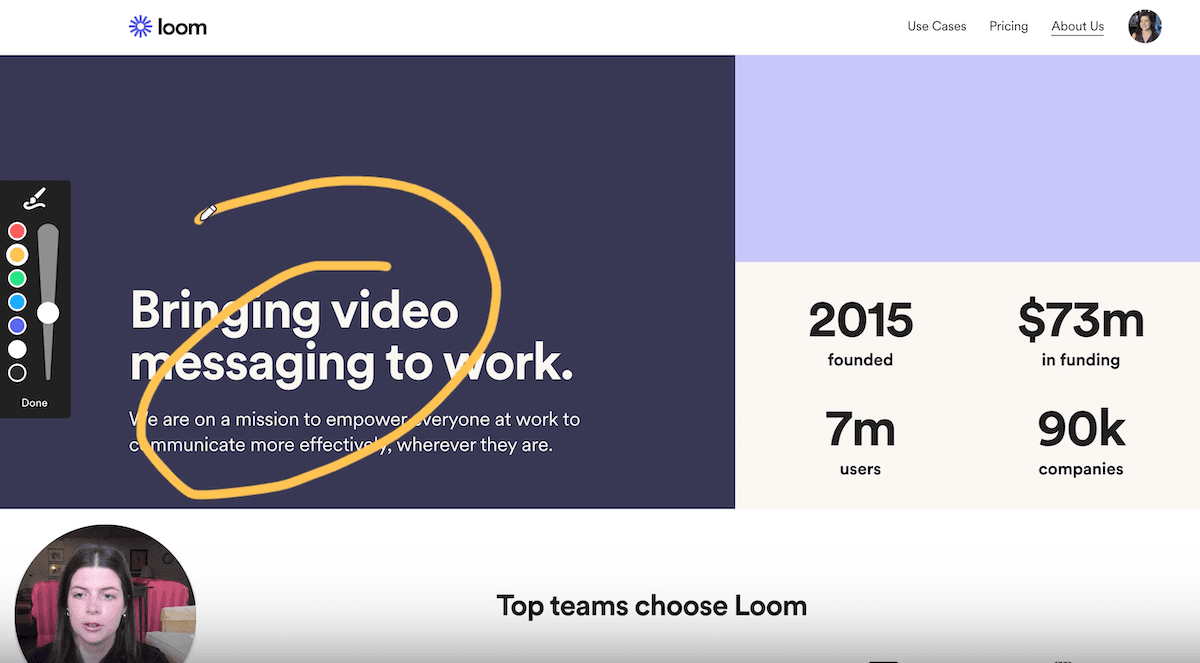
If you want to highlight specific features or elements on your screen, Loom has a drawing tool you can use.
Step 5. Finish recording
Click the red “Stop Recording” button when you’ve finished. Loom will automatically store your recording in its built-in content library.
Step 6. Review and edit your recording
Head to your Loom content library to review your video recording and trim the beginning or end of your video if needed.
Create a title and description for your YouTube video so it’s ready to publish.
Step 7. Upload your video recording on YouTube
Download your video from Loom in MP4 format and then upload it to your YouTube channel.
TL;DR? Here’s a quick video of Loom’s Lifecycle Marketing Manager explaining how to record a video using the Loom desktop app:
Recording YouTube videos on your PC
For simple screen recording, you can use your PC’s built-in screen recorder by pressing the Windows Key + Alt + R buttons on your keyboard.
But for more advanced screen recording controls and the ability to record yourself in the webcam, you’ll need a third-party screen recorder like Loom to record your Windows PC.
Loom works the same way for both PC and Mac computers. You can download the desktop app or use its Chrome extension for screen capture.
Next, just follow the same steps as above, which include selecting your recording mode and simply pressing the record option. When you’ve finished, stop recording, download the video, and publish it on YouTube.
How to record YouTube videos on your phone
Here’s a step-by-step process to capture videos on a smartphone, including iPhone and Android.
Recording YouTube videos on your iPhone
Like your Mac, you can use a free screen recorder like Loom to record and edit your YouTube videos from one platform. Loom also allows you to record only your screen, the front-facing camera, or the audio.
Here’s a step-by-step process to help you record YouTube videos on your iPhone using Loom:
Download the Loom iOS app from the App Store.
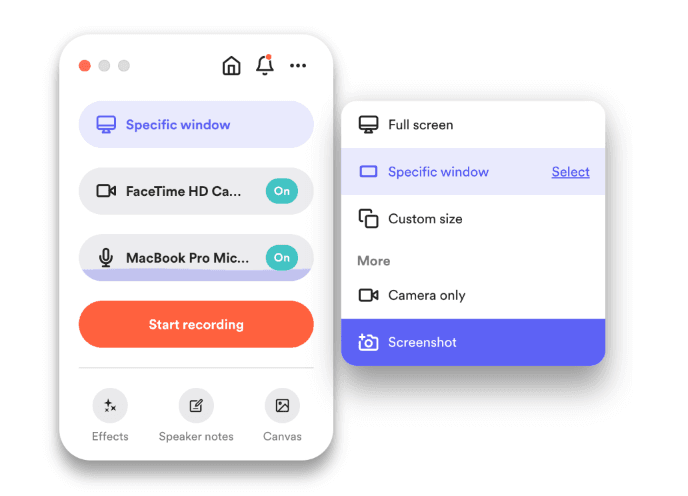
Open your Loom app and select the “Screen” option from the bottom of your screen.
Loom iPhone screen recorder Tap the mic button to enable it, and select Screen Broadcast >> Start Broadcast. A red bar will appear at the top to indicate that the recording is in progress.
Tap that red bar when you’re ready to stop recording.
The video will automatically be processed in your My Video library. Create an engaging title, description, and thumbnail before publishing it to your YouTube channel.
Pro tip: Enable the “Do Not Disturb” option before recording to avoid unexpected distractions like notifications and calls.
Recording YouTube videos on your Android
Loom also offers an Android app to help you record your screen and the camera simultaneously. This option isn’t available with the iOS app.
You can also choose to record only the screen or the camera individually.
Here’s a quick overview of the steps to record YouTube videos on your Android phone using Loom:
Download Loom for Android from Google Play.
Open the app and click the Loom icon at the bottom of your screen.
Next, select the recording mode: camera + screen recording or audio + screen recording. You can choose all three at once, too.
Finally, select the “Record screen” option.
Your recording will begin after a 3-second countdown. A recording control menu will also appear on the right side of your mobile screen. You can move it around to see the progress and pause or stop the recording. It also has a “Cam” button that lets you turn the camera on and off while screen recording.
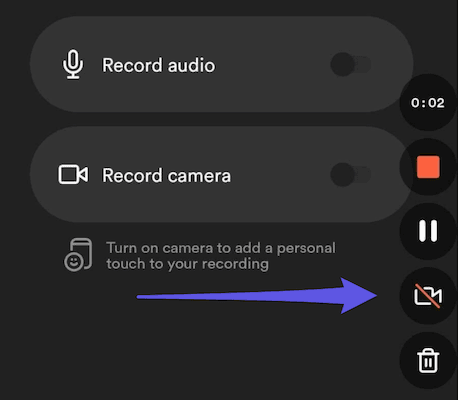
Loom mobile recording control menu Select the red “Stop” button when you’ve finished recording.
Finally, select the title, trim any unnecessary parts, and publish it on YouTube for your audience.
What equipment do you need to record YouTube videos?
With over 2.49 billion monthly active users, YouTube is the world’s biggest video platform, giving you the chance to get your message across to millions of viewers. But you need the right equipment to create engaging content and capture your vision.
Here’s list of some must-have equipment to record YouTube videos:
Camera: Your camera will capture your expressions and every move, making your videos more personal. While a fancy DSLR or mirrorless camera is nice, many modern smartphones offer impressive video capabilities, which should also suffice.
Microphone: A good microphone ensures top-notch audio quality even in a noisy environment. Consider a lapel mic for on-the-go recording or a USB microphone for studio setups.
Lighting: Natural light is sufficient in most cases, but if you want a more professional look, you can invest in LED panels to create a well-lit scene.
Editing software: This is where the real magic happens. Editing software lets you cut, trim, add effects, and polish your videos. You can choose among the many free and paid options available.
You don’t need to buy expensive equipment, especially when you’re just starting out. Focus on creating great content—as your channel grows, you can gradually upgrade your gear.
When to prioritize great recording and editing software
You've got a brilliant idea for a product review, but the thought of setting up your camera, microphone, and editing software appears taxing.
Isn't there an easier way to share your expertise without the tech headache? While the individual tools for recording, editing, and camera capture might seem like the way to go, a simpler solution can streamline your entire workflow.
If you’re creating content like product reviews, walkthroughs, tutorials, or even just talking head videos, you can use a screen and camera recorder like Loom.
Loom combines screen recording, camera capture, and basic editing features into one easy-to-use platform. This means you can record, edit, and share your videos without leaving the app, saving you time and hassle.
For example, here’s a YouTube video recorded with Loom:
Learning how to edit YouTube videos as a beginner
Think of video editing as your digital darkroom—it’s where you turn your recordings into an engaging, captivating story that your viewers can relate to.
Here’s a quick overview of the tips and video creation tools you need to know about to start editing your recorded YouTube video.
Choose your editing software
There is no one-size-fits-all solution, so choose software that matches your budget, skill level, and operating system.
Popular choices for beginners include:
iMovie: Free and user-friendly for Mac users
InShot: Mobile app for quick and easy editing on the go
Adobe Premiere Pro: The industry standard for professional editors, but with a steeper learning curve
Loom: All-in-one software for video recording and making quick edits
While Loom’s not a full-fledged video editor, it’s perfect for creating product demonstrations, tutorials, or any video where you need to capture your screen and camera simultaneously.
Pro tip: If you don’t need advanced editing features, use a single tool to record and edit your YouTube videos. Loom is a great option for this, as it streamlines the process—you record, edit, and finalize your video within the same tool, eliminating the need to switch between apps. There’s no need to upload your video to another platform for editing before publishing it on YouTube.
Master the basics of editing
Ever watched a video where the editing felt a little abrupt and disorienting? One moment, you're smoothly following along, and the next, you're jolted by a sudden jump cut or a transition.
Most of the time, you won’t need to add those over-the-top effects to your YouTube video. If you're making product reviews, walkthroughs, or similar content, your goal is clarity above all else.
So, what does that mean for your editing process? Focus on these fundamental editing skills to refine your YouTube video recording:
Cutting and trimming: Remove the irrelevant parts from the video and create a smooth flow. If you’re using Loom, you can use the AI add-on to automatically remove filler words and pauses.
Adding transitions: Smoothly connect different clips together.
Adjusting audio levels: Make sure your voice is clear and there’s no background noise. If you’re adding background music, make sure it’s not overpowering and matches the tone of your messaging.
Adding text and graphics: Use features like Loom’s drawing tool to highlight specific elements on your screen during recording, making it easier for viewers to follow along.
Use editing to tell a story
Editing isn't just about making things look pretty—it's about crafting a narrative that engages viewers. Think about the message you want to convey and use editing techniques to reinforce it.
For example, quick cuts can create a sense of urgency, while slow-motion shots can add drama and emotion.
Don’t hesitate to experiment a bit and play around with different effects and transitions until you find what works for you.
How to publish and promote your YouTube video
You put your heart and soul, not to mention countless hours, into recording your YouTube video. Now, you need to promote it to get it in front of your target audience.
But before you publish your video, take a moment to optimize it for maximum impact. This means crafting a title, description, and the perfect thumbnail. These elements will be your video’s first impression—make them count.
Video title: Keep it short, sweet, and keyword-rich. A good title should evoke curiosity and accurately reflect your video’s content. For example, instead of "My Vacation in Hawaii," try “10 Jaw-Dropping Hawaiian Adventures You Won’t Believe.”
Description: Use this space to provide more context and include relevant keywords. For example, the description for this YouTube video, “How to Use Loom Screen Recorder,” contains keywords like “Loom screen recorder tutorial” and “record your screen,” clearly stating its purpose. It also includes timestamps for different sections, making it easy for viewers to jump to the relevant information immediately.
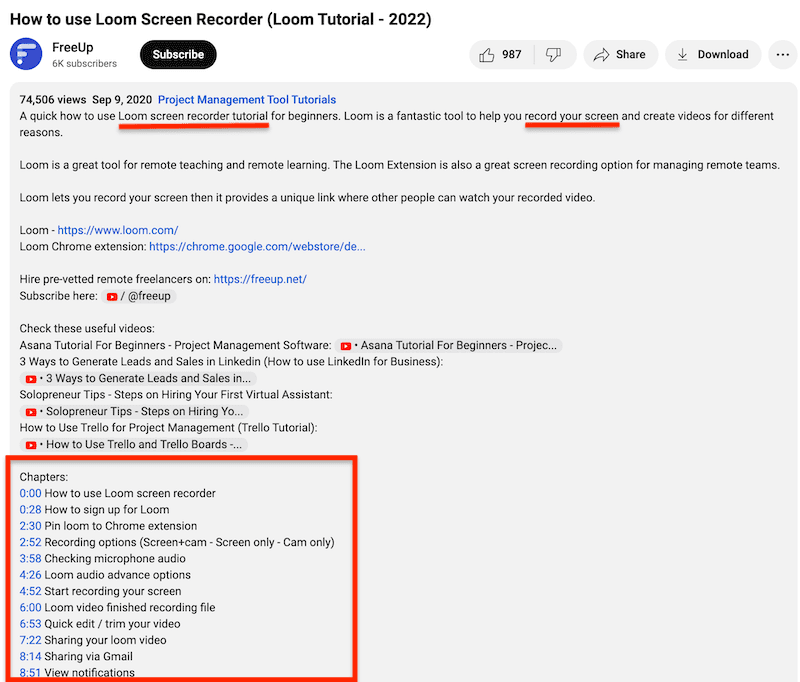
Thumbnail: Choose a high-quality image that accurately represents your video and grabs attention. A custom thumbnail is always better than a generic one.
Remember, YouTube is a visual platform, so aesthetics matter. A well-optimized video is more likely to get clicks and views, which can lead to higher rankings in YouTube’s search results.
Now that your YouTube video has a great title, description, and thumbnail and is ready to publish, it’s time to promote it.
Want to get your video seen by your target audience?
Here are some tactics to promote your YouTube video:
Share on social media. Share the YouTube video across all your social channels, including Twitter and LinkedIn. You can even create a short teaser trailer to give a peek into your video and create a buzz.
Collaborate with other content creators. Team up with creators or brands in your niche and cross-promote your video. This will help you reach new audiences.
Engage with your community. Respond to comments, answer questions, and participate in discussions. This will help you build a loyal community, boost your search engine rankings, and compel your audience to share your video with their acquaintances.
Run contests and giveaways. Who doesn’t like free stuff? Use contests and giveaways to compel your audience to subscribe and share your videos.
Use paid advertising. If you have the budget, you can also run paid ads on YouTube or other platforms to reach a wider audience.
The key to effective promotion is persistence and experimentation with different strategies. What works for one channel may not work for another, so try new things and discover what resonates with your audience.
It’s your turn to create and publish YouTube videos
Whether you plan to record YouTube videos from your laptop or smartphone, the process is simple and only takes a few steps. All you need is the right equipment, including a screen recorder that captures your screen, camera, and audio and allows you to edit your video.
Loom has you covered. It’s an all-in-one screen recorder that’s especially helpful for recording YouTube tutorials, product demonstrations, and even personal vlogs.
Ready to start your YouTube journey? Record high-quality YouTube videos within your budget with Loom.